One of the most important tools that I had during the construction of my MiniCup is a
set of saw-horses. For years I've used ones made out of 2X4s and light metal
brackets however they are not strong enough for all uses. Because of this, and also
because I saw a really neat pair a friend of mine had made, I decided to build a solid set
that I could use as scaffolding for my on-going house repairs as well as future boat
projects. Since there is little out there as far as plans for sawhorses and most
people are mystified by how to make them, I have posted my drawings in CAD
DXF format and TurboCad
TCW format as well as posting them in image format. Click on the image for a
larger version.

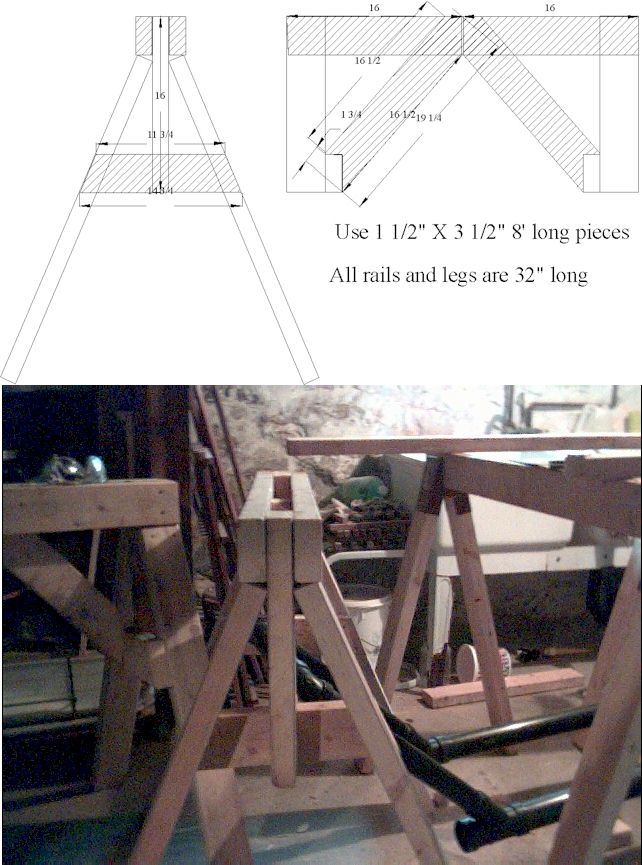
Saw Horse Detail
Building Instructions
Note: all material is based on a "standard" 2X4 with finished dimensions being 1
1/2" X 3 1/2". I used 3" nails as fasteners, but 2 1/2" screws
would actually probably work better.
- Cut the 32" long rails and legs.
- Cut the 16" long vertical support.
- Attach the rails to each side of the top of the vertical supports.
- Cut the 14 3/4" side braces and attach then centered on the bottom of the vertical
supports on the inside of the sawhorse.
- Attach the legs to the side braces.
- Attach the legs to the vertical support. Yes, the legs don't meet the top or
vertical perfectly. They should be fine though.
- Now cut the first centre brace. To do this
- First draw an angled line from the bottom corner of the 2X4 to 1 1/2" in on the
other side.
- Place the but end of a 2X4 scrap on this as shown and draw around it to determine the
"mouth" of the piece. Draw the outline of the 2X4 and cut. I used a
circular saw to cut until the saw blade touched the inside corners, then used a hand-saw
to complete the cut.
- Measure down 16 3/4" on both sides, and then 19" and 21 1/4" as shown and
draw the diagonals.
- Cut out that part.
- Use the first centre brace as a pattern to draw out the next one and cut it out.
- Test fit the centre braces and trim the tops as appropriate to make them fit.
- Attach the centre braces to the cross brace and to the top rails.
And there, you're done.
